Start a new Stencyl game
After you've properly installed the Nuggeta Extension we can actually Start a new Stencyl game.
I'll start by creating a new blank game, with the name Gijutsu. I'll leave the width and height at 640x480 px.
The first Scene that we will create will be the Intro scene. We will use this scene to present our players with the title of our game, the ability to play as a guest or login using the 3 available choices (Fb, G+ or Nuggeta), and maybe we'll add a mute sound/music button as well.
Without loosing too much time you can safely create a new scene with the name Intro and the rest of the options should remain at their default values, and since we won't use the scene editor just yet you can close the Intro tab for now.
Let's first add a button with the title of our game, and a button for our Guest login button. And since I already mentioned my impressive artistic skills in the first page of this blog series I will just embarrass myself by posting all the pictures here. First the Title button:
Let's add it inside Stencyl by going into Actor Types and creating a new Actor type. I'll just name it Title, and I'll add an animation to it. So let's add the first and only frame of this title, and since I originally made this button too big I'll choose the following when importing it into Stencyl:
You can safely use 1X as your scale if you have the correct dimensions in your buttons and you are positive that you will not need the rescale option later on.
Since our title won't have any use in the game we will edit it's physics tab to a Cannot Move Actor Type and in the Advanced tab we can select Simple for the Actor Mode. We can also disable Continuous Collisions as they are not needed.
Then we can import the Play as Guest button using the same values as above (I changed the scale to 1.5 thou):

Having a title button is pretty sweet, but if it's not actually placed in the scene it's pretty much a waste of space.
Let us create our first scene behavior for our game. We will use it to create a title, the buttons we need to play as guest or to login to a social network and we will also use this behavior to listen to the messages from the Nuggeta Servers.
For now we'll just place the Title and a Play as Guest button so we must create a new Scene Behavior. I named mine IntroBehavior.
In a Created event I will place the title in the top center and the guest button somewhere below that. Since I know the width of the actor I will just place it in the scene like this:


Then we can import the Play as Guest button using the same values as above (I changed the scale to 1.5 thou):
Having a title button is pretty sweet, but if it's not actually placed in the scene it's pretty much a waste of space.
Let us create our first scene behavior for our game. We will use it to create a title, the buttons we need to play as guest or to login to a social network and we will also use this behavior to listen to the messages from the Nuggeta Servers.
For now we'll just place the Title and a Play as Guest button so we must create a new Scene Behavior. I named mine IntroBehavior.
In a Created event I will place the title in the top center and the guest button somewhere below that. Since I know the width of the actor I will just place it in the scene like this:
Connect to the outside world:
Next we can actually connect to the Nuggeta address to be able to have a 2 players game. We can actually do it in this scene when the game loads. If you want to do it after you press the Play as Guest button you can also do that.
So go to the developer's page, login and copy the GAME ID I mentioned that you will need in the previous post. Armed with the GAME ID we can actually use the first Block in the Nuggeta Extension: Connect to address (I will use it inside a custom event called "Connect" and inside it I will add the GAME ID ) as the address.
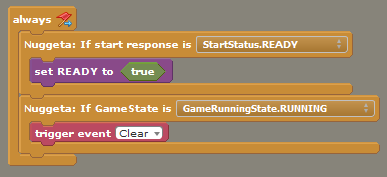
Whenever we send a message to the server it will give us a reply notifying us if the call was successful or not, and in this case when we try to connect we will get a StartStatus message. If that server replies with StartStatus.READY we can move on to the next step:


Connect players together
There are several ways to make more players play against each other. The logical steps would be to Create a game with the first client, and Join a game with the second player. Nuggeta (and the nuggeta extension) offers the ability to do so, however there are some steps missing from the above logic. First, the first player Creates a game, and he must actually join such game to make that step complete. The second player will actually have to request a list of games from the servers and pick a random one from a list of created games.
In case you think that those are the correct steps...You're Wrong. What if there is already a connected player with a created game awaiting for someone? If you create the game first you won't see the player that is sitting there waiting for someone to play with. And how will you know which one is the second player in the above steps? Both could be connecting at the same time. So what are the correct steps?
Search for a created game first. If one is found Join it. If none is found Create one and wait for a second player. Now, we could actually use those steps for our game, but the Nuggeta API and the extension provides all the above steps inside a single call/block: searchImmediateGames, so as soon as our connection to the Nuggeta servers is ready we can actually search for a random game and join it. But we'll search for a game after we press on the Play as guest button, and since we are checking the Start Response in a scene behavior I'll just create a game attribute boolean and set it to true when StartStatus is READY:
Now that we have a connection ready we can allow 2 players to play together after we press the Play as Guest button.
So we'll create an Actor behavior and we'll call it PlayAsGuest and we'll attach it to the Play as Guest button. Inside that behavior, inside an If mouse was Pressed on self event we'll check if our game attribute is true and we'll use the searchImmediateGames block in it:
Now we have a problem. What if the player presses the button again? Remember that you're only supposed to call searchImmediateGames ONCE! To get around that issue we could set the game attribute to false and it would fix our problem, but we could actually just kill the button and notify the player that we are waiting for a second player.
Create another actor(I named mine Waiting) with the same physics settings as the rest of our buttons and we'll use this as our actor (I used a scale of 2 to make it smaller):
After we created it just kill the PlayAsGuest button after we press it and create our Waiting actor in it's place:
That will prevent us from searching for a game more than once and it will notify the player that they need to wait for another player.Note that I also created another Text game attribute to show us that we pressed the Guest button. We'll need it in the scene behavior later on.
When 2 players actually join our game the Nuggeta will reply with a GameRunningState.RUNNING message, and we can actually let our 2 players play the game. But first we should notify each players who is Player 1 and who is Player 2.
I'll choose the easy route here and just notify them that they are Player1 and Player2 respectively. For that I will create 2 more actors:
In Stencyl I created 2 actor types named Player1 and Player2 with the same physics settings as the title, but the Scale was left at 1x this time.
So now all that's left to do is show the corresponding actors to each player before they can play against each other. Note that we do this when the server replies with GameRunningState.RUNNING and we'll use a custom event to do so, because we will need to modify it when we add social login buttons:
Based on the button that we press we'll perform different actions in the Clear event. For now we'll just check if our text attribute is Guest and code inside that check. The code is simple. Since 2 players are already connected we don't need the Waiting actor and we can create the Player1 or Player2 actors for each actors, then we'll change to a different scene (I created a new Scene named PlayingScene to change to) where the game can be played:
If you try to Test the game and open the game again (easiest way is to test in browser and open another tab with the same game) you will see our Player 1 and Player 2 buttons, each shown in a different tab. After a few seconds the scene will change.
This was a huge post and it's time to end it here. In the next one we'll start making the game board and we'll let our players actually play the game.