Thursday, July 3, 2014

Let's Play!

Claimed?


Last time we created our board and we prepared a 2D list that will let us know which squares are claimed and which are not.

In this post we'll actually learn how to claim a square, how to handle the animations and how to let our opponent see what square we claimed.

Lets start with claiming a square. 

But before that let's use a little bit of logic to figure out how things could be done (the major problem here is that we're applying my logic: You've been warned!).

What we need to do to claim a square? Well...we need to click it (dooh), then we should check if it's claimed or not, and if it's not we should claim it (meaning changing a value in our 2D list) and then change the animation of that square from the blue or red one to a green animation.
So this should be something like this:
if we pressed the mouse on a square
check to see if the value in the list is 0
and if value is 0
change that value to 1
change animation for that square to a green animation.

If you actually think that I'll be using the above "code"...You're Wrong Again! (I did warn you about the use of my own logic). I'll switch things up a little:
if we pressed the mouse on a square
if the animation for that square is not the green one
change the animation to the green one
//more to come after this part:

This will allow us to start simple and add more things as we move along, so here's how a When the mouse is pressed event would look after I previously created an actor attribute named squareActor (note that we're still working on the same PlayBehavior behavior we started in the last post):


The problems!

Since you must run your game twice to be able to test it, then you probably noticed that both players can claim a square when they press the mouse button, and they shouldn't be able to do that since they must take turns. 

To fix that, the Nuggeta Extension offers 2 blocks. A boolean that is true when it's the current player's turn to play, and false when it's not the player's turn, and a block that ends the current players turn to play. Our pseudocode would be something like this with those blocks:
if we pressed the mouse on a square
if it's our turn to play
......
claim at will
......
change turn after that
Our event would look like this now:


Should you test the game now you'd see that Player1 is the first one able to click a square, and after he claims a square, his turn changes (we'll handle the visual aspect of that turn change later on) and then the second player can claim a square. 

So far so good, but we still have problems:

Whenever a player claims a square, his opponent should actually see what square he claimed, so we need to figure out how we could change the animation of the claimed square for both our players. 
The only way to do that would be to send a message to our opponent and based on that message he should change the animation accordingly.

The Nuggeta Extension allows us to send a "raw message" to all our opponents, which means we don't need to create an object inside the Game Definition tab in the Nuggeta website, and that's what we'll use because there's no need to complicate things.
So now that we know that we can send a message to our opponent, we have to figure out what we should send. When we click on a square we could get it's X and Y coordinate and send those, or we could get the X and Y coordinates of the mouse and send those, or we could get the row and column number in our 2D list and send those, or ... I bet you can figure out what else we could send to our opponent, and maybe it will be a better choice than the one I'll pick next.

Ini mini miny moe!

After careful consideration (ahem) I decided to use the first option and just send the X and Y coordinates of the square to our opponent, so I added the corresponding block to our event:


Cool. Now we can send a message, which means we need to see how we can make the other player receive our message.
To do that we need to check when a raw message is received, and we need to do that inside an Always event. And don't worry, since you're only receiving that message once your code will only execute once even if it's inside that event.
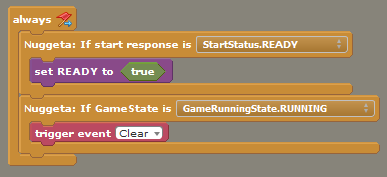
From now on our Click event will handle our own actions, and the Always event will handle what our opponent does, and since we want to show to the player what square his opponent claimed our Always event should contain this code:
If a Raw message was received 
save the message inside a list
get the X coordinate from the first item in the list
get the Y coordinate from the second item in the list
find the square that has those coordinates
change the animation for that square to the green one

In case nobody noticed, we might have another problem! Notice the "change the animation for that square" part? We already did that in the click event, and now we need to do the same thing again :( 
When ever such an issue occurs it's best to create a Custom Block so we'll do just that. 
What will we do with that block? We'll send that block the X and Y coordinate of the square we clicked on, or from the message we receive, and change the animation for the actor that has those coordinates. That's it!
I'll name mine Claim actor at X: [] Y:[], and this is how the Create Custom Block window looks like on my end in Stencyl:

Now we can go back to our Click event and modify it to use our new custom block:

This is the code that goes inside the Custom Block we just created:

I hope things weren't confusing, because so far we only modified what was already working (but we got rid of our problems... ≧◠◡◠≦✌ ), and our initial goal was to allow the players to see the squares that are claimed by their opponents. For that we added an Always event and I posted what we will do inside it in the above pseudocode.
I created a list attribute named messageList (so you should too) that we will use to store the coordinates we receive, and we'll send those coordinates to our Claim actor at X: [] Y:[] custom block:


Now if you test the game you will finally see that whenever we claim a square, our opponent will see it !

The last thing that we'll do in this part of the tutorial is to actually keep the squares that are claimed in our 2D list.
In the last post we created a 2D list named gridList, and we filled it with 0 when we created our board, and now we need to replace the 0 from that list with 1 for the square that we claimed and for the square that our opponent claimed. We'll let each player keep track of their own squares and their opponents squares and each player will be responsible to check if they won or lost.

Rows vs. Columns

When we click on a square we can visually see that said square belongs to a certain row and a certain column, but now we need to transform what we see into code. Let me clarify what I see when I talk about a row or column:

Notice that we start counting from 0 and not from 1 as you might expect, because it will be easier to transform the X and Y coordinates to Row and Column coordinates that we need for our 2D List.
To be even clearer, the greater the X value of our square will be, the greater the Column number will be, and the greater the Y value will be, the greater the Row number will be.
I created 2 additional attributes to store our Column and Row numbers and I (again cleverly) named them rowNumber and colNumber and I added the following to our Click event:


You may notice the replace entry at column # block and that I used rowNumber where that block claims to need a column number. That may be a bug in either the 2D list extension or a bug in my own logic (highly probable), but after printing the rowNumber and colNumber and also our 2D list I had to reverse those 2 attributes inside that replace entry.. block just to trick me that my own logic still works.

Now when we click on a square our 2D list gets updated properly, but we need to update it when the opponent claims a square also. That can be accomplished in exactly the same way that we did in the click event, but this time we need to add it in the Always event:

That's all there was to it. In the next post we'll mark the danger squares.

Tuesday, June 17, 2014

The Playground


Creating our second scene:

In the previous post we started making our multiplayer game, we added some buttons, and we connected 2 random players together.
Now it's time to give them something to play with.

In the previous post we created a second scene named PlayingScene. To make it look different we'll add a nice background to it:


We'll also add a new actor with 3 animations:


I'll cleverly name it Square, use a Scale of x1, in the Collision tab I'll mark it as a Is a Sensor, in the Physics tab I will mark the NO button in the Can Rotate section, we'll let the Affected by Gravity to Yes, and of course we'll also disable Continuous Collisions, and we'll set the Actor Mode to Simple.
The first Animation of our Square actor will be the blue one and the Name of the Animation will be 0 (the digit zero!). We'll add the second animation with the name 1 (the green one) and the third Animation with the name 2, which will be the remaining red square.

This is the actor that will form the board you saw in the first post. When it gets created it will use the first animation  (the blue one), when the player clicks on it we will change the animation to the green one, and we will mark the "danger" squares with the red animation.

The fun part:

The fun part needs a new Scene behavior named PlayBehavior and Photon's 2d List extension I mentioned in the first post.
Inside a Created event we'll just add a Do after .5 seconds block where we trigger an event named CreateBoard.
What do we add in it? Well..What do we need in our scene? We need to create a grid of 8x8 squares, we should probably keep the title of the game in this scene as well, and we should also display the Player1 and Player2 actors to be able to notify the players who's turn it is. We also need to create a 2D list that will be used for win/loose conditions as well as to keep track of the squares that the players claim. Eventually we will also add some score just to fill the screen with something interesting.

Let us begin by creating the grid. The logical way would be to use 2 repeat blocks and create our actors like this:


This would actually work nicely, however it is quite boring. What if we create our Squares somewhere else and  we just slide them in their position? It would still be boring, but at least it would look pretty, so let's do just that. It's actually simple to do. Create the actor somewhere below the screen bottom border and just move it in it's place:

When I tested this I noticed that my FPS's dropped a little, so I had to remove the collision box from my Square actor, on all 3 animations to overcome the problem.

Now that we created the grid it's time to add the Player1 and Player2 actors to show who's turn it is and the title of the game:

With the above done I'll stop adding anything else on the scene (for now) and I'll focus on what's under the hood of the game.

Under The Hood


What we need to do under the hood is to remember which squares are marked and which ones are not as our first task, and the most obvious solution would be to store them in a 2d list.

 To check for win/loose conditions we'd just need to check for matches on the same row, column or diagonal and it should be a lot easier than using a normal list.

Since, when the game starts, there are no claimed squares we could fill the list with 0 (zero) and we'll use 1 to remember the marked squares.
Create a list attribute that will hold our 2D list inside it, I named mine GridList, then if you haven't already, enable Photon's 2D List extension and insert the following inside the CreateBoard event:


And that's it for this post :)

In the next post we'll learn how to let the players claim those squares, figure out how to mark those danger squares and we'll let our players communicate that claimed square to their opponents.

P.S. This is the entire behavior up to this point:

Friday, April 11, 2014

Start the Creation !

Start a new Stencyl game


After you've properly installed the Nuggeta Extension we can actually Start a new Stencyl game.

I'll start by creating a new blank game, with the name Gijutsu. I'll leave the width and height at 640x480 px.

The first Scene that we will create will be the Intro scene. We will use this scene to present our players with the title of our game, the ability to play as a guest or login using the 3 available choices (Fb, G+ or Nuggeta), and maybe we'll add a mute sound/music button as well.

Without loosing too much time you can safely create a new scene with the name Intro and the rest of the options should remain at their default values, and since we won't use the scene editor just yet you can close the Intro tab for now.

Let's first add a button with the title of our game, and a button for our Guest login button. And since I already mentioned my impressive artistic skills in the first page of this blog series I will just embarrass myself by posting all the pictures here. First the Title button:


Let's add it inside Stencyl by going into Actor Types and creating a new Actor type. I'll just name it Title, and I'll add an animation to it. So let's add the first and only frame of this title, and since I originally made this button too big I'll choose the following when importing it into Stencyl:

You can safely use 1X as your scale if you have the correct dimensions in your buttons and you are positive that you will not need the rescale option later on.

Since our title won't have any use in the game we will edit it's physics tab to a Cannot Move Actor Type and in the Advanced tab we can select Simple for the Actor Mode. We can also disable Continuous Collisions as they are not needed.

Then we can import the Play as Guest button using the same values as above (I changed the scale to 1.5 thou):


Having a title button is pretty sweet, but if it's not actually placed in the scene it's pretty much a waste of space.

Let us create our first scene behavior for our game. We will use it to create a title, the buttons we need to play as guest or to login to a social network and we will also use this behavior to listen to the messages from the Nuggeta Servers.
For now we'll just place the Title and a Play as Guest button so we must create a new Scene Behavior. I named mine IntroBehavior.

In a Created event I will place the title in the top center and the guest button somewhere below that. Since I know the width of the actor I will just place it in the scene like this:


Connect to the outside world:


Next we can actually connect to the Nuggeta address to be able to have a 2 players game. We can actually do it in this scene when the game loads. If you want to do it after you press the Play as Guest button you can also do that.

So go to the developer's page, login and copy the GAME ID I mentioned that you will need in the previous post. Armed with the GAME ID we can actually use the first Block in the Nuggeta Extension: Connect to address (I will use it inside a custom event called "Connect" and inside it I will add the GAME ID ) as the address.

Whenever we send a message to the server it will give us a reply notifying us if the call was successful or not, and in this case when we try to connect we will get a StartStatus message. If that server replies with StartStatus.READY we can move on to the next step:

Connect players together


There are several ways to make more players play against each other. The logical steps would be to Create a game with the first client, and Join a game with the second player. Nuggeta (and the nuggeta extension) offers the ability to do so, however there are some steps missing from the above logic. First, the first player Creates a game, and he must actually join such game to make that step complete. The second player will actually have to request a list of games from the servers and pick a random one from a list of created games.

In case you think that those are the correct steps...You're Wrong.  What if there is already a connected player with a created game awaiting for someone? If you create the game first you won't see the player that is sitting there waiting for someone to play with. And how will you know which one is the second player in the above steps? Both could be connecting at the same time. So what are the correct steps?

Search for a created game first. If one is found Join it. If none is found Create one and wait for a second player. Now, we could actually use those steps for our game, but the Nuggeta API and the extension provides all the above steps inside a single call/block: searchImmediateGames, so as soon as our connection to the Nuggeta servers is ready we can actually search for a random game and join it. But we'll search for a game after we press on the Play as guest button, and since we are checking the Start Response in a scene behavior I'll just create a game attribute boolean and set it to true when StartStatus is READY:


Now that we have a connection ready we can allow 2 players to play together after we press the Play as Guest button. 
So we'll create an Actor behavior and we'll call it PlayAsGuest and we'll attach it to the Play as Guest button. Inside that behavior, inside an If mouse was Pressed on self event we'll check if our game attribute is true and we'll use the searchImmediateGames block in it:


Now we have a problem. What if the player presses the button again? Remember that you're only supposed to call searchImmediateGames ONCE! To get around that issue we could set the game attribute to false and it would fix our problem, but we could actually just kill the button and notify the player that we are waiting for a second player.

Create another actor(I named mine Waiting) with the same physics settings as the rest of our buttons and we'll use this as our actor (I used a scale of 2 to make it smaller):


After we created it just kill the PlayAsGuest button after we press it and create our Waiting actor in it's place:


That will prevent us from searching for a game more than once and it will notify the player that they need to wait for another player.Note that I also created another Text game attribute to show us that we pressed the Guest button. We'll need it in the scene behavior later on.

When 2 players actually join our game the Nuggeta will reply with a GameRunningState.RUNNING message, and we can actually let our 2 players play the game. But first we should notify each players who is Player 1 and who is Player 2. 
I'll choose the easy route here and just notify them that they are Player1 and Player2 respectively. For that I will create 2 more actors:


In Stencyl I created 2 actor types named Player1 and Player2 with the same physics settings as the title, but the Scale was left at 1x this time. 
So now all that's left to do is show the corresponding actors to each player before they can play against each other. Note that we do this when the server replies with GameRunningState.RUNNING and we'll use a custom event to do so, because we will need to modify it when we add social login buttons:


Based on the button that we press we'll perform different actions in the Clear event. For now we'll just check if our text attribute is Guest  and code inside that check. The code is simple. Since 2 players are already connected we don't need the Waiting actor and we can create the Player1 or Player2 actors for each actors, then we'll change to a different scene (I created a new Scene named PlayingScene to change to) where the game can be played:


If you try to Test the game and open the game again (easiest way is to test in browser and open another tab with the same game) you will see our Player 1 and Player 2 buttons, each shown in a different tab. After a few seconds the scene will change.
This was a huge post and it's time to end it here. In the next one we'll start making the game board and we'll let our players actually play the game.

Saturday, April 5, 2014

Quick overview of the Nuggeta Game Definition page

Find your way around:


This is the third post in this series, so please be sure to check the other posts first prior to this one.


In this post I will explain what we we use from under those 5 tabs that are presented to us in the game definition page we get after we create our game.

The first one is Definition. When we click it we will see the Game Configuration page. 

We are now inside the Game configuration page, and it's the first thing we will use to configure our game. We are presented with a GAME ID text output, a Server Logic check box and a Game Mode dropdown menu.

The  GAME ID was generated for us and the Nuggeta Extension will need it to start the connection to the Nuggeta server, so remember how to get to it because we will need to copy it later on. Try not to reveal the GAME ID to anyone.

The Server Logic check box will only be needed if you wish to add server code to your games. For our game we will not use it as the game will be created using client-side code. If you want to use server logic in your games you will be offered a link to download the environment needed to add your code on the server.

The Game Mode dropdown menu offers 2 choices: Connected and Disconnected. The text description bellow the menu can cause confusion, as we'll be making a turn based game, but we will not use the Disconnected option. For our game I'll leave the Connected mode selected.

Next is the Manifest window. When you open it you will be presented with the following:

From the Manifest window we can set the behavior of our game. We can select how many players will be needed by the game to start, the maximum number of players allowed to join our game, if the game auto starts and auto stops. For now we will not need to modify any values, as we want to have a game with only 2 players, and we also want to have the game auto start when 2 players are connected. 
Note that the use of the word "game" here does not refer to the game we will create in Stencyl, but instead refers to the game session available on the server.
We can also modify these values from within the game we are creating should there be the need to do so for other types of games.

The rest of the pages under the Definition tab are meant for advanced usage and I will not cover them in this post.


The next tab is the Social tab. Click it and you will be presented with the following:

Things are pretty self explanatory here. We are presented with the ability to add a LeaderboardAchievements and Items.
We will create a Leaderboard and some achievements in our game when time comes and I'll explain how to use the options presented to us in a later post.
The Items page could be used for creating Upgrades for your games or selling virtual goods. Since we won't use them in our game I'll skip them for now.

The Data tab is also for advanced users, and if you think you need them then please try to read the Documentation pages present on the Nuggeta website.

In the Admin tab you can see in real-time the number of connected players and the amount of game sessions that are active on the server.

The Publication tab will allow you to upload your game on the Nuggeta webpage so that it can be played directly from their site.


In the next post we will finally start to create our game in Stencyl :)

Friday, April 4, 2014

Create your game on the Nuggeta WebPage!

Step 1:


This is the second post in this series. Please read the first post before continuing.

Before actually working inside Stencyl we must declare our game on the Nuggeta WebPage so that we can download the API files needed for the Nuggeta Extension.

Head over to http://www.nuggeta.com and Sign Up for a developer account. The process is NOT automatic, so be patient for a few hours.

In the mean time I would like to mention some of the things that can be achieved using the Nuggeta API:
  • Turn based synchronous or asynchronous games. Synchronous works for a single gaming session like the game we're making, while Asynchronous games can last for several gaming sessions like RPG's.
  • Social networks integration. We can allow our players to play as guest users or log in using their Facebook, Google, Nuggeta and soon Twitter credentials. The ability to challenge a friend from either social network and posting on the wall for facebook or google users is now easier than ever.
  • Works on all platforms, which means we can port our games without changing a single line of code.
  • Chat system. We can send messages to all the connected players or to a specific one.
  • AchievementsEncourage players to explore your game in new and interesting ways
  • Leaderboards. You have to show them who's the boss in your game :)
  • Virtual Store. You can create your goods on the Nuggeta webpage or even add new ones without having to create a new version of the game to include them.
  • Cloud Data. We can save useful information in the Cloud like progress or preferences.
  • Server Logic. While we won't be using it in our game, Nuggeta provides the ability to code your own server logic in Java.
  • Earn money. You can earn money if you upload your game/s to play.nuggeta.com without adding a single line of code. 
NOTE: Not all these features are yet integrated in the Nuggeta Extension at the time of this writing and some features will only work if you customize the extension for your specific game.

There are many more things that could be accomplished using Nuggeta, and you can find more information on their website.


But let's get back to creating our game on the Nuggeta website:

After you've received confirmation on your created account head over to the Developer page and Sign IN. 
Click the Create Game button on the top left side. You should see something similar to this:


GAME ID is only used for the API files that we will download and can be any name we choose. Don't create another game using the same GAME ID. I decided to put "skill" in my GAME ID. Don't use Upper Case letters.
NAME is the commercial name of your game, so I put "Gijutsu" in the NAME field.
Hit CREATE after you've finished. Note that we can't delete a game after it was created.

After the creation process is completed you will be redirected to the Client API page where you can download the API files needed by the Nuggeta Extension, but first let's explain where and how we can add various parameters to our games. 


In the above picture we have 2 buttons and 5 tabs. 
The Download Libraries button will take us to the Client API page where we can download our API files, and the Deploy Sandbox button will activate our game on the Nuggeta servers. After we've downloaded the API files we must press it, and whenever there is a major change in our game definition the website will inform us that we need to press it again.

I'll provide a quick overview of the Nuggeta Game Definition page in the next post.

Create a Turn Based multiplayer game in Stencyl

Small presentation first !


In this series of blog posts I will show you how to make a turn based multiplayer game in Stencyl.
I will use Stencyl Version 3.0 for this series, the Nuggeta extension and Photon's 2D list extension.
I will also assume that the reader has acquired some basic knowledge on how things work in Stencyl, as this guide is aimed for Intermediate level users. I will NOT use any pre-made behaviors throughout this series of blog posts.

But, before actually starting I would like to point the following: The Nuggeta extension WAS MADE for Turn Based games, and, at the time of this writing, real-time multiplayer games CANNOT be created using this extension.

The GAME!

I would like to create a 2 player game, where the players are presented with an 8x8 grid of squares, each player takes his turn to click on a square to mark it as Claimed. We will change the color of the claimed square to show that it's been claimed, and we will also mark the danger squares in red to show the player that if they click on them, their opponent can win.
The player who connects 3 claimed squares in a row, column  or diagonal is declared the winner.

I decided to name the game Gijutsu, and from the screenshot below you will realize that my artistic skills are non existent (hopefully someone can help me with that aspect at some later point).


This is a pretty basic example of a multiplayer game, but it should allow you to understand the logic that you must apply to your own games, and it should teach you how to use the Nuggeta Extension.

Without wasting more time let's first start by Creating our game on the Nuggeta webpage so that we can download the API files needed for the extension.